Archive:
Good camera implementations in games are super interesting, often hiding a lot of subtlety from the player in order to present the best view of the action. Don’t believe me? Check out this quick run-down of some of the camera-modes in Super Mario World.
Since cameras are good sport to figure out (and a few of my students have asked recently), I thought I’d quickly talk about what I’ve been doing with mine. It’s probably worth mentioning that this is pretty simple, so this write-up is unlikely to contain any surprises for the seasoned dev. Hopefully it’ll still be useful if you’re just starting to think about this stuff, though.
The inspiration for my current project is obviously the early Zelda games, but Link Between Worlds on the 3DS is probably the best thing to compare against, as it’s 3D and on “modern” hardware.
Zelda-type camera implementations have discreet modes depending on what the player is doing / what type of gameplay is in the area. You can roughly list the main ones as:
Both of these modes can be restricted to an area. IE: the camera movement will be clamped to predetermined bounds. This is most obvious in the Dungeons where you transition between rooms — the camera doesn’t show you the next room until you go through a door — but the same happens in outdoor areas. You’ll often transition (with a forced scroll) from a wooded area to a “village” or some such. I’ll be doing the same thing in my game to cover up the level streaming between outdoor zones.
You can also argue that the transitions in and out of these modes are also discreet states that require handling (and they will, in code), but for simplicity I’m going to skip over those here.
My first pass at writing this camera system was to break down the camera logic into a state machine, roughly along the lines above, and start building functionality. This was a mistake. It lead me down the path of writing each discreet camera mode as its own, “sub-”state machine, which just overly complicated everything.
I quickly threw that away and started again with the simplest state:
The major thing we want here is to “lead” the player — to make sure that the camera gets in front of the player in order to show them more of where they’re heading. This means:
Note that third point. We don’t want to know what the character in the world is doing, we want to know the player’s intention.
If the camera is attached, in some way, to the rotation of the character in the world then this will probably feel laggy. The character isn’t going to “flip” from one direction to the next, instantly. Instead it’s (most likely) going to rotate over a few frames to look smoother on the eye. This smoothing is acceptable in terms of moving the character, but it’ll make the camera do long, slow arcs, as it follows the rotation. This will probably look wrong, and definitely feel weird.
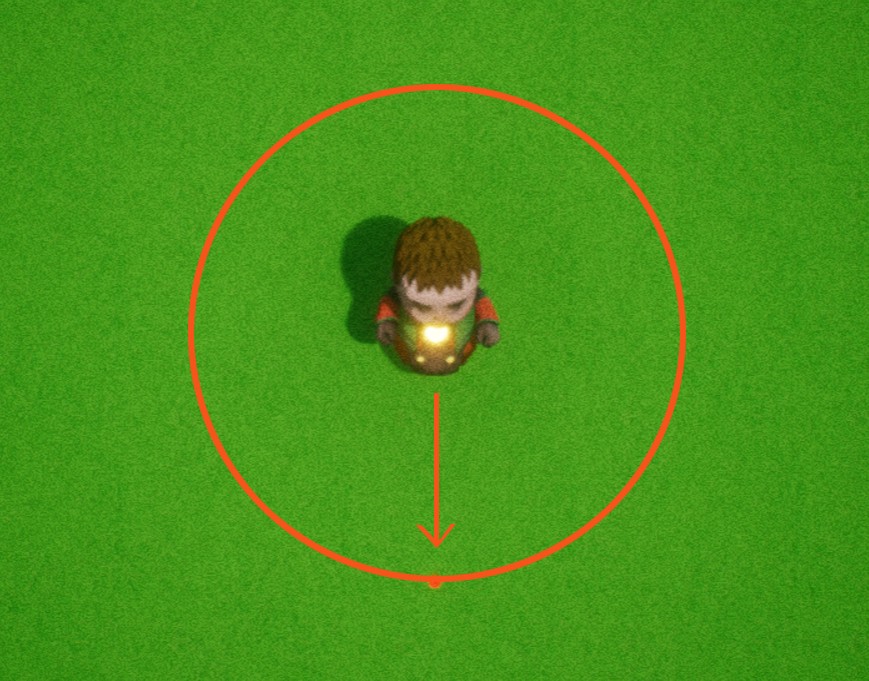
Getting the player’s intention is as simple as reading the current stick input. This gives us a direction vector, which we can normalise, and then multiply out by any distance we want. The result of this — when added to the player’s current position — is a new, “wanted” position, with no other considerations taken into account.
If you imagine a circle of such wanted positions — one for each direction the player could be heading in, centered around the player — then this ring represents the limits of where the camera can move when it’s leading the player:
To move the camera from its current position to our new “wanted” position, we need to work out the trajectory to move along. We’re not going to jump to the outer ring in one go, but rather in a series of small steps.
We can do this by subtracting the wanted position from the camera’s current position, which gives us a directional vector between the two locations.
To move along this direction vector, we normalise it, multiply it by: (camera’s movement speed * DeltaTime) and then add the result to the camera’s current location. This gives us an intended “final position”.
Yup, we’ve made a really slow homing missile. Simples.
Now we have the “final position” all that’s left is the conditional stuff:
If the final position is too far away from the player (outside the ring we identified in the first step) then we need to limit it. One way is to check the Size() of the vector between the intended final position and the character, and use GetClampedToSize() to find the position on the outer ring, if it’s too long.
If we’re going to track the ground height, then we need to make a few choices. We could use a fixed height between the camera and the player character, but this feels a bit off to me when the character can jump.
We could just raycast from the camera’s position, down to the ground, and then fix our height based off that, but then we’re going to get lots of weird issues when the camera “falls off” a cliff that the player is looking out over.
So instead I opted to raycast down from the player character — ignoring whether they are jumping, or not — and finding the height of the ground directly underneath. The new camera height is just this, plus a fixed amount, but this may cause issues if there are areas in the world with very sharp inclines. In my case this isn’t a problem, I’m making the world and I’ll avoid doing this, but as a belts and braces thing I lerp between changes in height so it’ll always be smooth.
The last thing to think about is how to handle when the player has moved the left stick on the gamepad — giving us a new wanted position — but the player character is unable to move in the world, or the character is moving very slowly. As it stands the camera will continue to move toward its outer limits at a fixed speed, which (in my game) looks wrong.
The way I’ve opted to fix this is in the step where I calculate the trajectory between the camera’s current position and the new wanted position. Rather than multiplying this trajectory by: (camera’s movement speed * DeltaTime) I also take into account how much they’ve moved the stick on the gamepad, and how quickly the character is moving in the world. This looks a bit more like: (camera movement speed * (Stick Input * Speed of character in the world)) * DeltaTime
’ve not mentioned the bounds checking in any of this, as it’s simply a Clamp(). How you get the bounds into the camera system is down to you. I have an area controller which contains this data, and I grab it via the game mode.
There are other niceties we can think about that are down to personal taste:
There’s plenty of ways we can plus this...
As you can guess, this isn’t really a special mode, it’s just deciding if we’re going to track ground height at any given point. We can do this with trigger areas in the world, or even at the game mode level. In my case I ended up making a sub-class of my camera specifically for dungeons, but mainly because I wanted to split out how I transition between rooms. On reflection, there was absolutely no need to do this.
In my game I remove control from the player when they’re in a conversation, so the main focus mode is simply a lerp to a focal point that’s either determined by the object that’s being interacted with, or the mid-point between the character and the NPC they are conversing with.
To make this look nicer, I use easing curves on the lerp.
When returning to follow (locked or free), I’ve not had to do anything. It actually looks better to have the camera move from where it is, rather than refocus on the player. I might change this in the future, though.
I’m not finished with combat at the minute, but the way I intend to do this is by modifying the camera’s wanted position to either be a point between the character and NPC, or on a circle around the NPC. Basically, I want the camera to focus on the thing the player is attacking, not the player’s character in the world, so biasing toward the NPC seems the way to go here. I’ll update this post once I’ve written it.
This is pretty simple. Any input from the D-Pad creates an additional direction vector which I add, as a final stage, to what we’ve calculated as the camera’s “final” follow position. Because the D-Pad is digital, I ramp the length of this vector up as the button is pressed, and down when it’s released, to smooth the additional movement. Just be careful to ramp the vertical and horizontal directions separately, to avoid weird results.
By clamping the length of D-Pad’s direction vector (which is inherent in how I ramp it up and down over time), nothing breaks by just adding it. Height is unaffected, but there could be a case where the camera clips against a cliff edge when pushed too far. Fortunately, my world isn’t tall enough for this to be a problem and I only let the player manually move the camera short distances.
This override is ignored in focus modes, as it’s not useful.
--
Bear in mind, this sort of follow cam may not be for you. I’m specifically emulating a Zelda-type implementation with the express desire to lead the player and frame important things in the best way, without manual control.
UE4 has a camera boom system which you can easily point straight down to avoid having to do any of this work, or even attach it to something that follows the character in the world, but in my opinion, it’ll not have some of the niceties that the player will feel even if they’re not aware of them.
The real magic is in that list of things we could do to plus this system (some of which are above), and how we transition between the camera’s discreet modes in a smooth and seamless way.
Which I’m leaving down to you :D
Musings, random thoughts, work in progress screenshots, and occasional swears at Unreal Engine's lack of documentation -- this is a rare insight into what happens when a supposedly professional game developer plans very little up-front, and instead follows where the jokes lead them.
Journal IndexFriends:
If you like any of my work, please consider checking out some of the fantastic games made by the following super talented people: